Spring boot와 MongoDB로 파일 업로드 및 다운로드하기
✒️ 2025-05-28 13:21 내용 수정
- 참고 자료 : Hansani Tharaka's File Upload/Download with SpringBoot and MongoDB
- Spring boot와 MongoDB로 파일 업로드 및 다운로드하기에선 로컬 저장소에 파일을 업로드/다운로드하는 동작을 처리했지만 다른 저장소(특히 DB)에 저장하는 경우엔 기존 방법에서 살짝 다르게 수정해야 했다.
- 이 방법을 적용할 개인 프로젝트에선 DB로 MongoDB를 사용하고 있어 해당 설정으로 방법을 정리했다.
- 테스트를 서버 체크리스트 프로젝트에서 진행해서 패키지 이름이 프로젝트 패키지로 되어 있다.
- 시작하기에 앞서 MongoDB와 연동으로 DB와 연결하고, 데이터를 잘 주고 받는지 확인한다.
GridFS
- MongoDB는 파일 시스템에 바이너리 파일을 저장하는 기능을 지원한다.
- GridFS는 크기 제한이 16 MB인 BSON document보다 큰 파일을 저장하고 가져오는데 특화되어 있다.
- 공식 문서 : MongoDB GridFS
- 하나의 document에 파일을 저장하는 대신 GridFS는 파일을 부분이나 chunk로 나누고 각 chunk를 다른 document에 저장한다.
- 기본 chunk 크기는 255 KB로, 마지막 chunk를 제외하고 파일을 255 KB로 나눈다.
- 마지막 chunk는 필요한 만큼의 사이즈를 가지며, 파일이 chunk 크기보다 작다면 마지막 chunk만 존재한다.
- GridFS는 파일을 2개의 collection에 저장하며, 하나는 파일의 chunk들을 저장하고 다른 하나는 파일의 메타 데이터를 저장한다.
fs.files: 저장된 파일의 메타 데이터fs.chunks: 저장된 파일의 바이너리 chunk
- GridFS에 파일을 쿼리(query)할 경우, 드라이버는 chunk를 필요한 만큼 재조립한다.
- GridFS를 사용하면 전체 파일을 메모리에 로드할 필요 없이 원하는 파일을 저장하고 접근하는데도 유용하다.
GridFS 사용이 적합한 경우
- 16MB 이상의 파일을 저장하기 때문에 파일 시스템 레벨에서 저장하는 것보다 MongoDB에 저장하는 것이 효율적인 경우가 있다.
- 파일 시스템이 디렉터리에 저장될 파일의 수를 제한할 때
- 파일들을 전부 메모리에 로드하지 않고 많은 파일들의 일부분에 있는 정보에 접근하고자 할 때
- 파일들과 메타 데이터를 자동으로 동기화하고, 여러 시스템과 시설에 배치하고자 할 때
GridFS 사용이 적합하지 않은 경우
- 파일의 전체 내용을 원자적으로 업데이트할 때
- 대안으로는 각 파일의 다양한 버전을 저장하고, 현재 버전을 메타 데이터에 저장할 수 있다.
- 파일의 새 버전을 업로드한 후 메타 데이터 필드 중 최신 상태를 표시하는 필드를 업데이트하고 필요 시 이전 버전을 제거할 수 있다.
- 저장하려는 파일들이 16 MB BSON document 크기 제한보다 작을 때
- 이 경우 GridFS를 사용하는 것 보다 각 파일을 하나의 document에 저장하는 것이 좋을 수 있다.
BinData데이터 타입을 사용하여 바이너리 파일을 저장할 수 있다.
Spring boot와 GridFS
- 공식 문서 : Spring boot GridFS Support
- 아래 설명은 공식 문서의 내용을 그대로 번역하였다.
- Spring Data MongoDB는 GridFS 사용을 위한
GridFsOperations/ReactiveGridFsOperations인터페이스와 그 구현 클래스, 파일 시스템과의 상호작용을 도와주는GridFsTemplate/ReactiveGridFsTemplate이 있다.- Template 객체는
MongoDatabaseFactory/ReactiveMongoDatabaseFactory,MongoConverter로 설정할 수 있다.
- Template 객체는
class GridFsConfiguration extends AbstractMongoClientConfiguration {

	// … further configuration omitted

	@Bean
	public GridFsTemplate gridFsTemplate() {
		return new GridFsTemplate(mongoDbFactory(), mappingMongoConverter());
	}
}
- 등록된 template은 주입하여 사용할 수 있고, 저장 및 검색 작업을 수행하는데 사용할 수 있다.
store()동작은 저장할 파일의InputStream, 파일 이름, 선택적으로 메타 데이터 정보를 받는다.- 메타 데이터는 임의의 객체가 될 수 있고, 이는
GridFsTemplate으로 구성된MongoConverter에 의해 변환된다. - 메타 데이터로
Document를 사용할 수도 있다.
class GridFsClient {

	// GridFsOperations를 해당 클래스에 의존 주입
	@Autowired
	GridFsOperations operations;

	// 파일을 GridFS에 저장하기
	@Test
	public void storeFileToGridFs() {
		// 파일의 메타 데이터
		FileMetadata metadata = new FileMetadata();
		// populate metadata
		Resource file = … // 파일이나 리소스 검색

		// InputStream, 파일 이름, 메타 데이터를 받아 저장
		operations.store(file.getInputStream(), "filename.txt", metadata);
	}
}
find()나getResource()를 사용하여 파일 시스템에서 파일들을 읽을 수 있다.- 예시의
find()에선 query와 일치하는 파일을 검색한다.Query는GridFsCriteria도움 클래스를 사용하여 생성할 수 있다.
GridFsOperations는ResourcePatternResolver를 상속 받으며GridFsTemplate가ApplicationContext에 연결될 수 있도록 만들어 MongoDB에서 Spring Config 파일을 읽을 수 있도록 한다.
- 예시의
class GridFsClient {

	@Autowired
	GridFsOperations operations;

	// 파일 검색하기 - GridFsOperations 메소드
	@Test
	public void findFilesInGridFs() {
		GridFSFindIterable result = operations.find(query(whereFilename().is("filename.txt")));
	}

	// 파일 검색하기 - ResourcePatternResolver 인터페이스
	public GridFsResources[] readFilesFromGridFs() {
		return operations.getResources("*.txt");
	}
}
1. 프로젝트 설정하기
- 먼저 Spring boot 설정, Spring boot, MongoDB와 연동으로 프로젝트 기본 설정과 DB 연결을 진행한다.
application.properties에MultipartConfig관련 설정을 추가한다.
spring.servlet.multipart.enabled = true
spring.servlet.multipart.max-file-size = 200MB
spring.servlet.multipart.max-request-size = 200MB
yml파일이라면 아래처럼 작성한다.
spring:
	servlet:
		multipart:
			enabled: true
			max-file-size: 200MB
			max-request-size: 200MB
build.gradle에commons-io의존성을 추가한다.- 2024.10.25 기준
2.17.0버전이 최신 버전이다.
- 2024.10.25 기준
dependencies {
    implementation 'org.springframework.boot:spring-boot-starter-web'
    implementation 'org.springframework.boot:spring-boot-starter-web-services'
    implementation 'org.springframework.boot:spring-boot-starter-data-mongodb-reactive'
    implementation 'org.springframework.boot:spring-boot-starter-data-mongodb'
    implementation 'commons-io:commons-io:2.17.0'
}
2. 클래스 추가
- document 클래스를 정의하는게 아닌 파일을 GridFS Collection에 바로 저장하므로
@Document(collection = "checklist")을 적용하지 않는다.
package com.ase.serverckecklist.dto;

import lombok.Getter;
import lombok.Setter;

@Getter
@Setter
public class LoadFile {
    private String filename;
    private String fileType;
    private String fileSize;
    private byte[] file;
}
3. Service 추가
- 파일의 업로드와 다운로드를 관리할 Service를 추가한다.
package com.ase.serverckecklist.service;

import com.ase.serverckecklist.dto.LoadFile;
import com.mongodb.BasicDBObject;
import com.mongodb.DBObject;
import com.mongodb.client.gridfs.model.GridFSFile;
import lombok.RequiredArgsConstructor;
import org.apache.commons.io.IOUtils;
import org.springframework.data.mongodb.core.query.Criteria;
import org.springframework.data.mongodb.core.query.Query;
import org.springframework.data.mongodb.gridfs.GridFsOperations;
import org.springframework.data.mongodb.gridfs.GridFsTemplate;
import org.springframework.stereotype.Service;
import org.springframework.web.multipart.MultipartFile;

import java.io.IOException;

@Service
@RequiredArgsConstructor
public class FileService {

    private final GridFsTemplate template;
    private final GridFsOperations operations;

    // 파일 저장하기
    public String addFile(MultipartFile file) throws IOException {
        // 메타 데이터 생성
        DBObject metadata = new BasicDBObject();
        metadata.put("fileSize", file.getSize());

        // GridFS에 파일 저장하기
        // InputStream, filename, metadata 정보로 파일을 저장함
        Object fileID = template.store(
                file.getInputStream(), file.getOriginalFilename(),
                file.getContentType(), metadata);

        // 파일 id를 반환
        return fileID.toString();
    }

    // 파일 가져오기
    public LoadFile downloadFile(String id) throws IOException {
        // GridFS에 저장된 파일 중 _id가 찾으려는 id와 일치하는 파일을 query
        // GridFsCriteria 클래스로 Query를 정의할 수 있음
        GridFSFile gridFSFile = template.findOne( new Query(Criteria.where("_id").is(id)) );

        // 받아올 파일 정보를 저장한 객체
        LoadFile loadFile = new LoadFile();

        // GridFS에 검색한 파일이 존재하거나 메타 데이터가 존재할 때
        if (gridFSFile != null || gridFSFile.getMetadata() != null) {
            // 받아올 파일 객체에 GridFS의 정보들을 저장
            loadFile.setFilename(gridFSFile.getFilename());
            loadFile.setFileType(gridFSFile.getMetadata().get("_contentType").toString());
            loadFile.setFileSize(gridFSFile.getMetadata().get("fileSize").toString());
            loadFile.setFile(IOUtils.toByteArray(operations.getResource(gridFSFile).getInputStream()));
        }

        return loadFile;
    }
}
4. Controller 추가
package com.ase.serverckecklist.controller;

import com.ase.serverckecklist.dto.LoadFile;
import com.ase.serverckecklist.service.FileService;
import lombok.RequiredArgsConstructor;
import org.springframework.core.io.ByteArrayResource;
import org.springframework.http.HttpHeaders;
import org.springframework.http.HttpStatus;
import org.springframework.http.MediaType;
import org.springframework.http.ResponseEntity;
import org.springframework.web.bind.annotation.*;
import org.springframework.web.multipart.MultipartFile;

import java.io.IOException;

@RestController
@RequestMapping("file")
@RequiredArgsConstructor
public class FileController {

    private final FileService fileService;

    // GET
    // 파일 다운로드하기
    @GetMapping("/download/{id}")
    public ResponseEntity<ByteArrayResource> download(@PathVariable("id") String id)
    throws IOException {
        LoadFile loadFile = fileService.downloadFile(id);
        String filename = URLEncoder.encode(loadFile.getFilename(), StandardCharsets.UTF_8.toString());

        return ResponseEntity.ok()
                .contentType(MediaType.parseMediaType(loadFile.getFileType()))
                .header(HttpHeaders.CONTENT_DISPOSITION, "attachment; filename*=UTF-8\""+filename+"\"")
                .body(new ByteArrayResource(loadFile.getFile()));
    }

    // POST
    // 파일 업로드하기
    @PostMapping("/upload")
    public ResponseEntity<?> upload(
	    @RequestParam("file")MultipartFile file) throws IOException {
        // 응답의 body에 파일 id를 넣어 전송
        return new ResponseEntity<>(fileService.addFile(file), HttpStatus.OK);
    }
}
5. HTML 추가
- HTML은 참고 자료의 HTML 내용에 이미지 출력만 더하여 그대로 사용하였다.
- HTML을 보여주기 위한
TestController의@GetMapping("/")을 따로 추가하여return "uploadFomr"으로 페이지를 반환했다.
<!doctype html>
<html lang="en" xmlns:th="https://www.thymeleaf.org">
<head>
    <meta charset="UTF-8">
    <meta name="viewport"
          content="width=device-width, user-scalable=no, initial-scale=1.0, maximum-scale=1.0, minimum-scale=1.0">
    <meta http-equiv="X-UA-Compatible" content="ie=edge">
    <title>Document</title>
</head>
<body>
    <div>
        <div>
            <h2>File Upload / Download Example</h2>
        </div>
        <div>
	        <form id="fileUploadForm">
                <h3>File Upload</h3>
                <input type="file" name="file" id="fileUploadInput" class="file-input" required>
                <button type="submit" class="submit-btn">Upload</button>
            </form>
        </div>

		<div>
			<div id="downloadFileUrl"></div>
            <img id="downloadFileImg" alt="이미지">
        </div>
    </div>

	<script>
		let uploadForm = document.querySelector("#fileUploadForm");
        let uploadFormInput = document.querySelector("#fileUploadInput");
        let downloadFile = document.querySelector("#downloadFileUrl");
        let downloadFileImg = document.querySelector("#downloadFileImg");

        // 파일 업로드
        function uploadFile(file) {
            // formData 생성
            let formData = new FormData();
            formData.append("file", file);

			// 요청 객체 생성
            let req = new XMLHttpRequest();
            req.open("POST", "http://localhost:9000/file/upload");

            req.onload = function () {
                let response = req.responseText;

                if (response !== null) {
                    let downloadUrl = "http://localhost:9000/file/download/" + response;

                    downloadFile.innerHTML = '<p>File Upoaded Successfully. <br/> <a href="'
                    + downloadUrl + '" target="_self">Download File</a></p>';
                    downloadFile.style.display = "block";
                    downloadFileImg.src = downloadUrl;
                } else {
                    alert("Error Occured! No file returned");
                }
            }
            req.send(formData);
        }

        // 제출 동작
        uploadForm.addEventListener('submit', function (event) {
            const files = uploadFormInput.files;

            if (files.length !== 0 ) {
                uploadFile(files[0]);
                event.preventDefault();
            } else {
                alert('Please select a file')
            }

        }, true);
    </script>
</body>
</html>
6. 테스트
- 어플리케이션을 실행하고 웹 브라우저에서 파일 업로드 페이지로 이동한다.
- 이미지를 선택하여 파일을 추가한다.
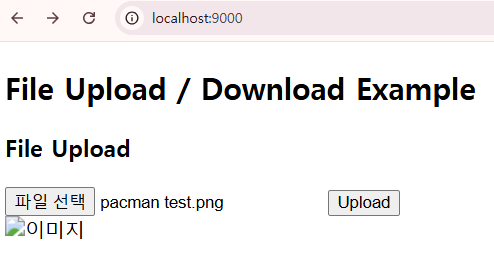
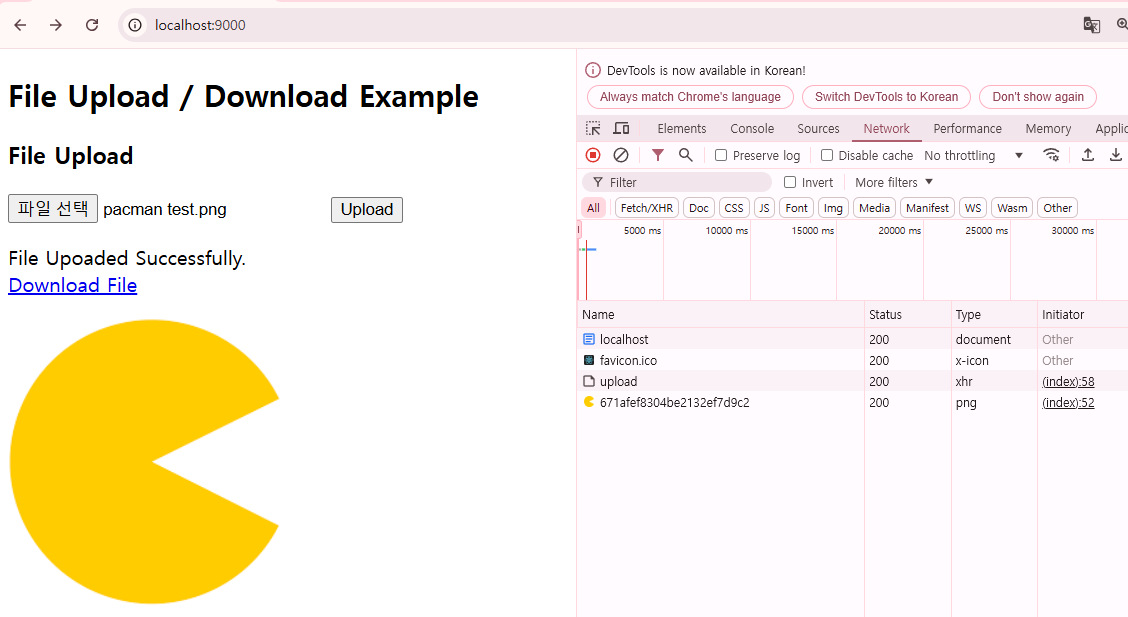
- 전송이 잘 되었다면 파일 다운로드 링크와 함께 이미지에서도 파일이 출력된다.
- 오른쪽 네트워크 탭을 보면 응답의 결과가 파일의 id로 뜬다.
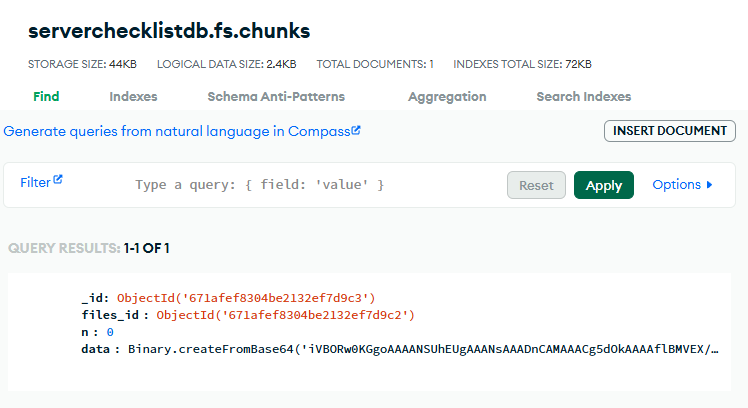
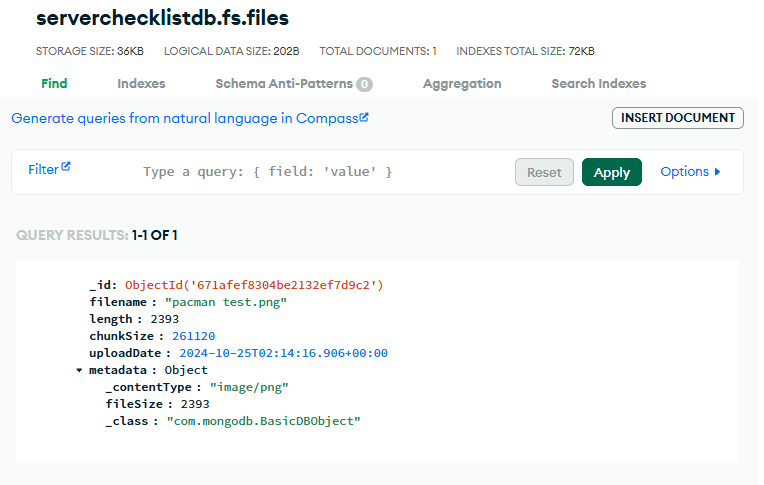
- MongoDB에서 collections에 접속하여
fs.filescollection이 있는지 확인한다.- 업로드한 파일의 이름, 크기, chunkSixe, 업로드 날짜, 메타 데이터가 저장되어 있다.
fs.chunks에도 데이터가 저장되어 있는지 확인한다.- 실제 파일의 chunk들이 저장된 collection이다.